Getting Started
The MCP server (@audioeye/testing-sdk-mcp) is published to the public npm registry and licensed through a
browser sign-in, so it needs none of the registry or credential configuration below. If MCP is your entry point, go
straight to the MCP server guide: install, sign in, scan. Come back here when you want the CLI or a test-runner
adapter.
What you'll do in this guide
In this guide, you'll:
- confirm that your project meets the SDK requirements
- retrieve your AudioEye client credentials (a Client ID and a Client Token)
- configure
npm,yarn, orpnpmto install AudioEye packages - set your client credentials as environment variables so the SDK can verify your license when it runs
- install your first SDK package
- verify that the installation works locally
- configure CI/CD so your builds can install the SDK and run scans securely
If you want the fastest path to a first successful run, start with the CLI. It is the quickest way to confirm that your credentials, package-manager configuration, and local environment are all working.
What success looks like
By the end of onboarding, you should be able to:
- install an AudioEye SDK package from your project's root
- run one successful accessibility scan locally
- add your client credentials to CI/CD so installs and scans work outside your machine
- continue into the package guide that matches your existing test workflow
Available packages
AudioEye's Accessibility Testing SDK is available as npm packages:
- CLI -
@audioeye/testing-sdk-clifor scanning a URL, page, or HTML document - Jest -
@audioeye/testing-sdk-jestfor component-level testing in unit and integration tests - Playwright -
@audioeye/testing-sdk-playwrightfor browser-based end-to-end and workflow testing - Cypress -
@audioeye/testing-sdk-cypressfor browser-based end-to-end and workflow testing in Cypress - MCP server -
@audioeye/testing-sdk-mcpfor AI coding agents (Claude Code, Cursor, and other MCP hosts). Published to public npm with browser sign-in; see the MCP server guide for its own setup. - Core -
@audioeye/testing-sdk-corefor custom integrations when you need lower-level control
Choose the right starting point
If you're new to the SDK, start with the package that best matches how your team already tests the application:
- Use the CLI if you want the fastest way to scan a page or local HTML file.
- Use Jest if you want to catch accessibility issues while testing components.
- Use Playwright or Cypress if you need to test full user flows such as login, checkout, routing, or authenticated pages.
- Use the MCP server if you want an AI coding agent to scan a page and propose source-level fixes. It has its own quick start and skips the registry setup below.
- Use Core only if you are building your own wrapper or integrating the rules into a custom test harness.
Requirements
The AudioEye Accessibility Testing SDK supports every Node.js LTS release line that has not reached end of life —
currently 22 and 24.
You will also need:
- an AudioEye Client ID and Client Token (together, your client credentials)
- a JavaScript or TypeScript project that uses
npm,yarn, orpnpm - access to your project's package root, where
package.jsonlives
Before you install anything
AudioEye distributes SDK packages through Cloudsmith. Before you can install any SDK package, you must retrieve your AudioEye client credentials and configure your package manager to use them.
Your Client ID and Client Token are available in the AudioEye Customer Portal. Your Client Token does double duty: it authenticates package downloads from Cloudsmith and, together with your Client ID, licenses the SDK when it runs (see How licensing works).
Step 1: Get your client credentials
- Log in to the AudioEye Customer Portal.
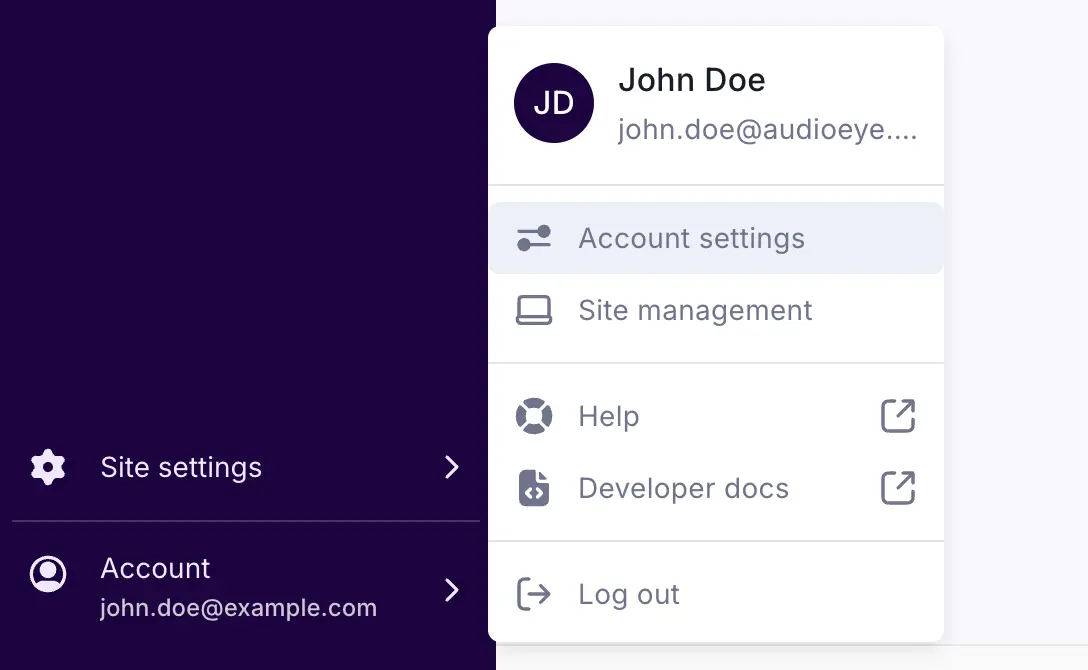
- Open the account menu and select Account settings.
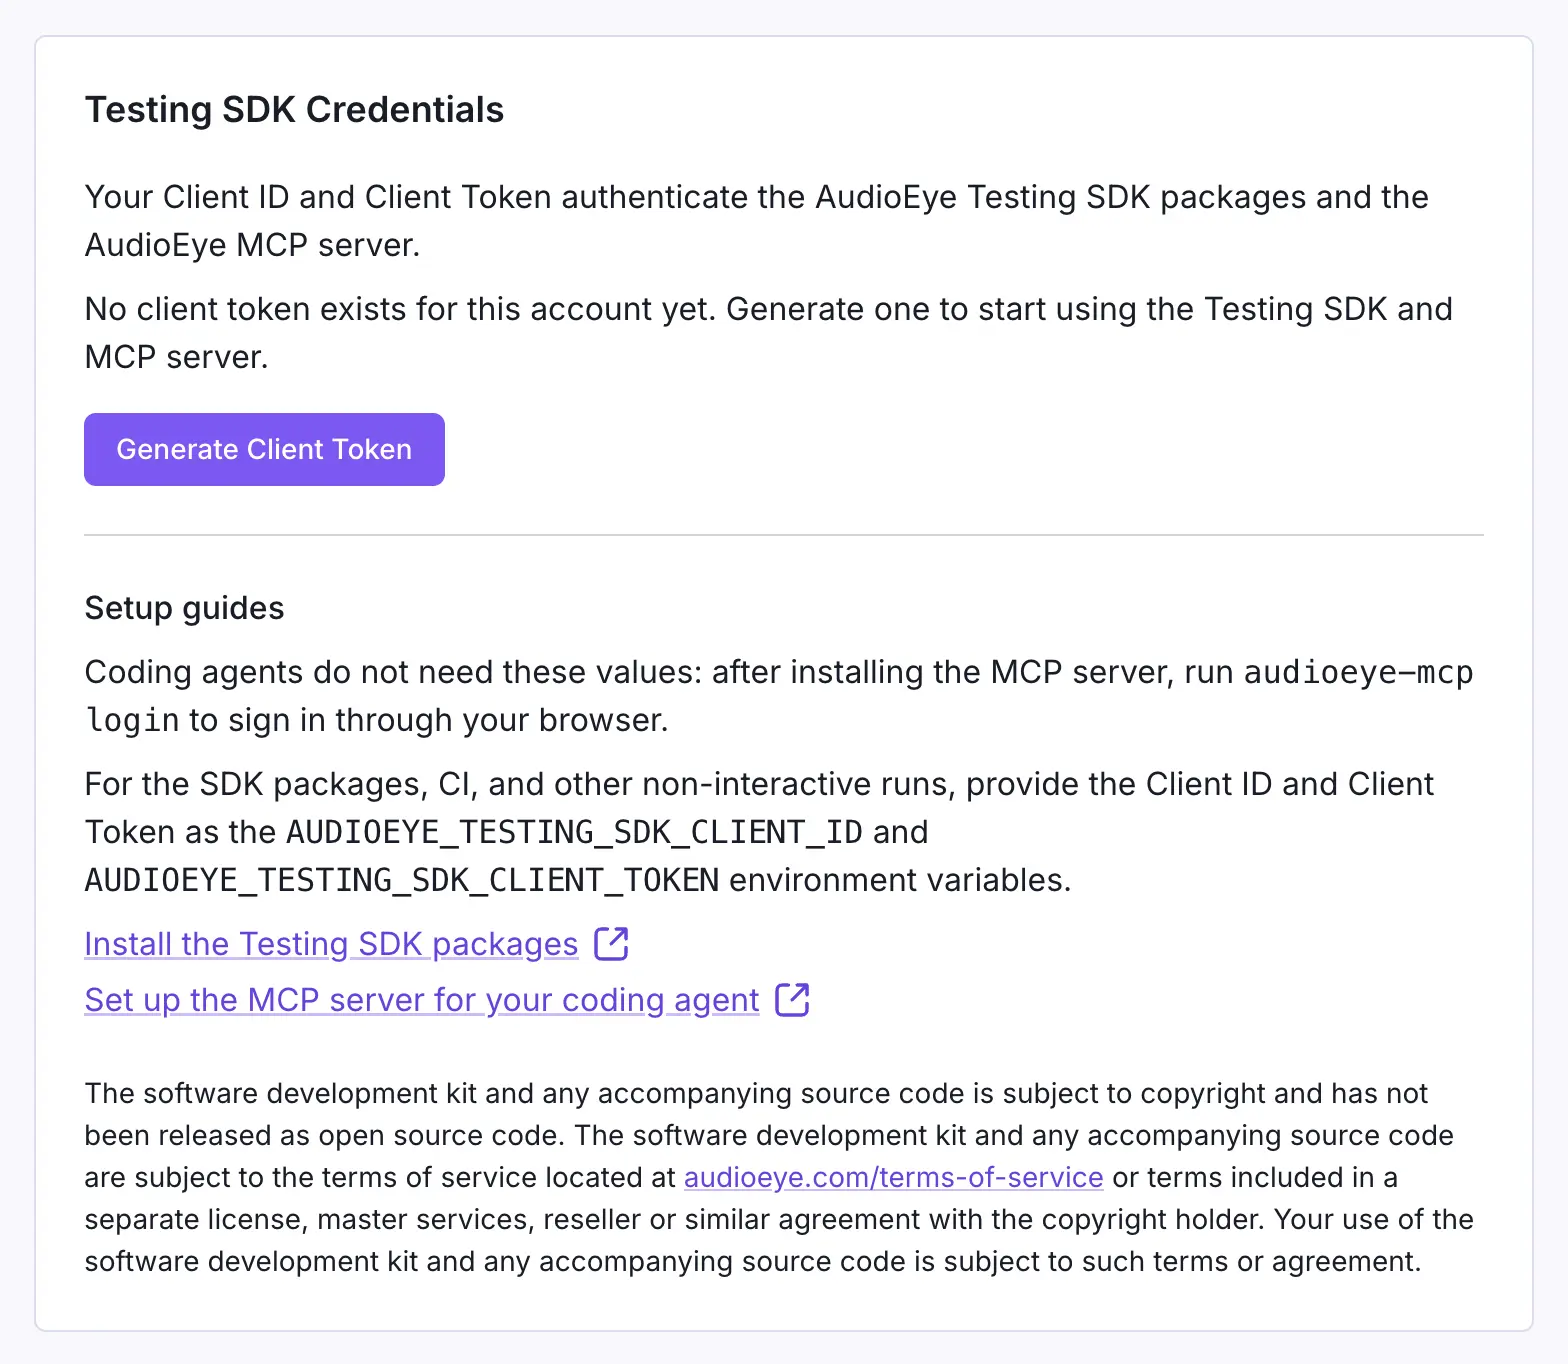
- Scroll to the Testing SDK Credentials section.
- If you have not created credentials yet, click Generate Client Token.
- Copy your Client ID with Copy Client ID, and copy your Client Token with Copy Client Token.
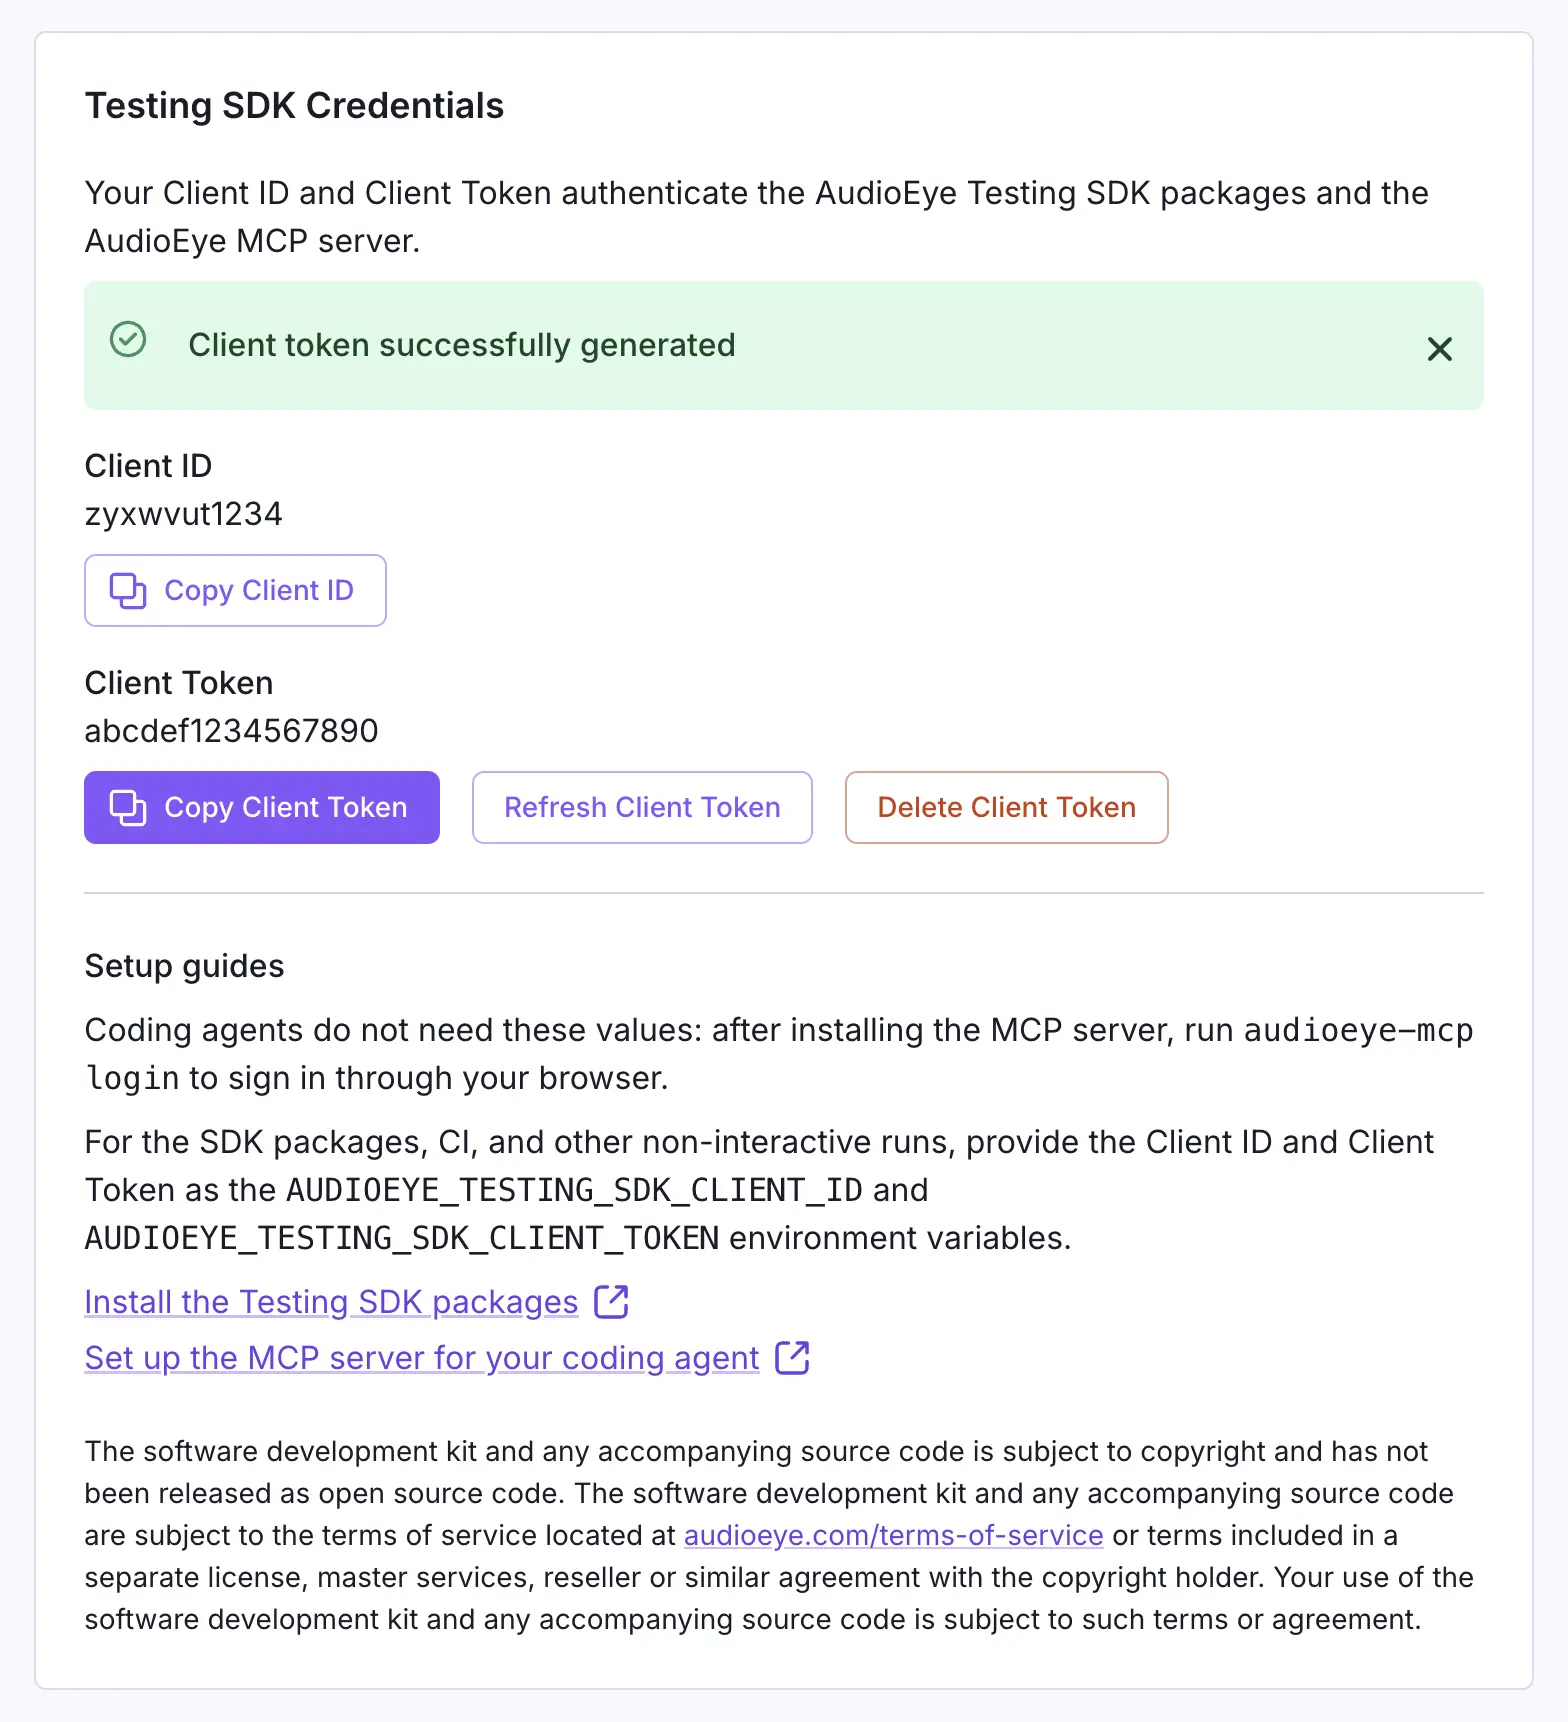
Your Client Token is shown in full only immediately after you generate or refresh it. Copy it somewhere safe right away. (You can always issue a new one later with Refresh Client Token.) Your Client ID is not secret and stays visible on this page.
In the rest of this guide these are referenced as the environment variables AUDIOEYE_TESTING_SDK_CLIENT_ID and
AUDIOEYE_TESTING_SDK_CLIENT_TOKEN.
How licensing works
Starting with v6, the Testing SDK runs a lightweight license check each time it scans, verifying your AudioEye
license against the AudioEye API. The license must be verifiable when the SDK runs, not only when you install
packages. On a developer machine you can satisfy the check either way: sign in once through the browser with
aetest login (or the MCP server's audioeye-mcp login; see Sign in in the MCP guide), or set
both environment variables as described in this guide. A stored sign-in takes precedence; the SDK falls back to the
environment variables when there is no sign-in or the stored credentials fail validation.
- On a successful check, the SDK caches a license grace token locally that stays valid for up to 7 days, so scans keep working even offline within that window.
- The SDK re-validates online roughly every 24 hours in the background. A successful re-check refreshes the cached grace token; if AudioEye can't be reached, the SDK keeps using the cached token until it expires — so a temporary AudioEye outage (up to the 7-day window) won't break your scans.
- If the credentials are missing, invalid, or cannot be verified and there is no valid cached grace token, the scan
stops rather than silently passing — it fails closed and exits with a non-zero status. The CLI prints the reason as
Error running scan: <message>:
# credentials missing (not signed in, and one or both env vars not set):
Error running scan: Set AUDIOEYE_TESTING_SDK_CLIENT_ID and AUDIOEYE_TESTING_SDK_CLIENT_TOKEN to run the AudioEye testing SDK.

# credentials present but not accepted by AudioEye:
Error running scan: The AudioEye testing SDK token is invalid or inactive.

# credentials present but AudioEye could not be reached and no valid cached license exists:
Error running scan: AudioEye testing SDK validation failed (a successful check is required at least every 7 days): <details>
You set both variables in Step 2; CI configuration is covered under CI/CD integration.
Refresh your Client Token
If you need to rotate your Client Token, follow these steps:
- Log in to the AudioEye Customer Portal.
- Open the account menu and select Account settings.
- Scroll to the Testing SDK Credentials section.
- Click Refresh Client Token.
- Click Copy Client Token to copy the new token.
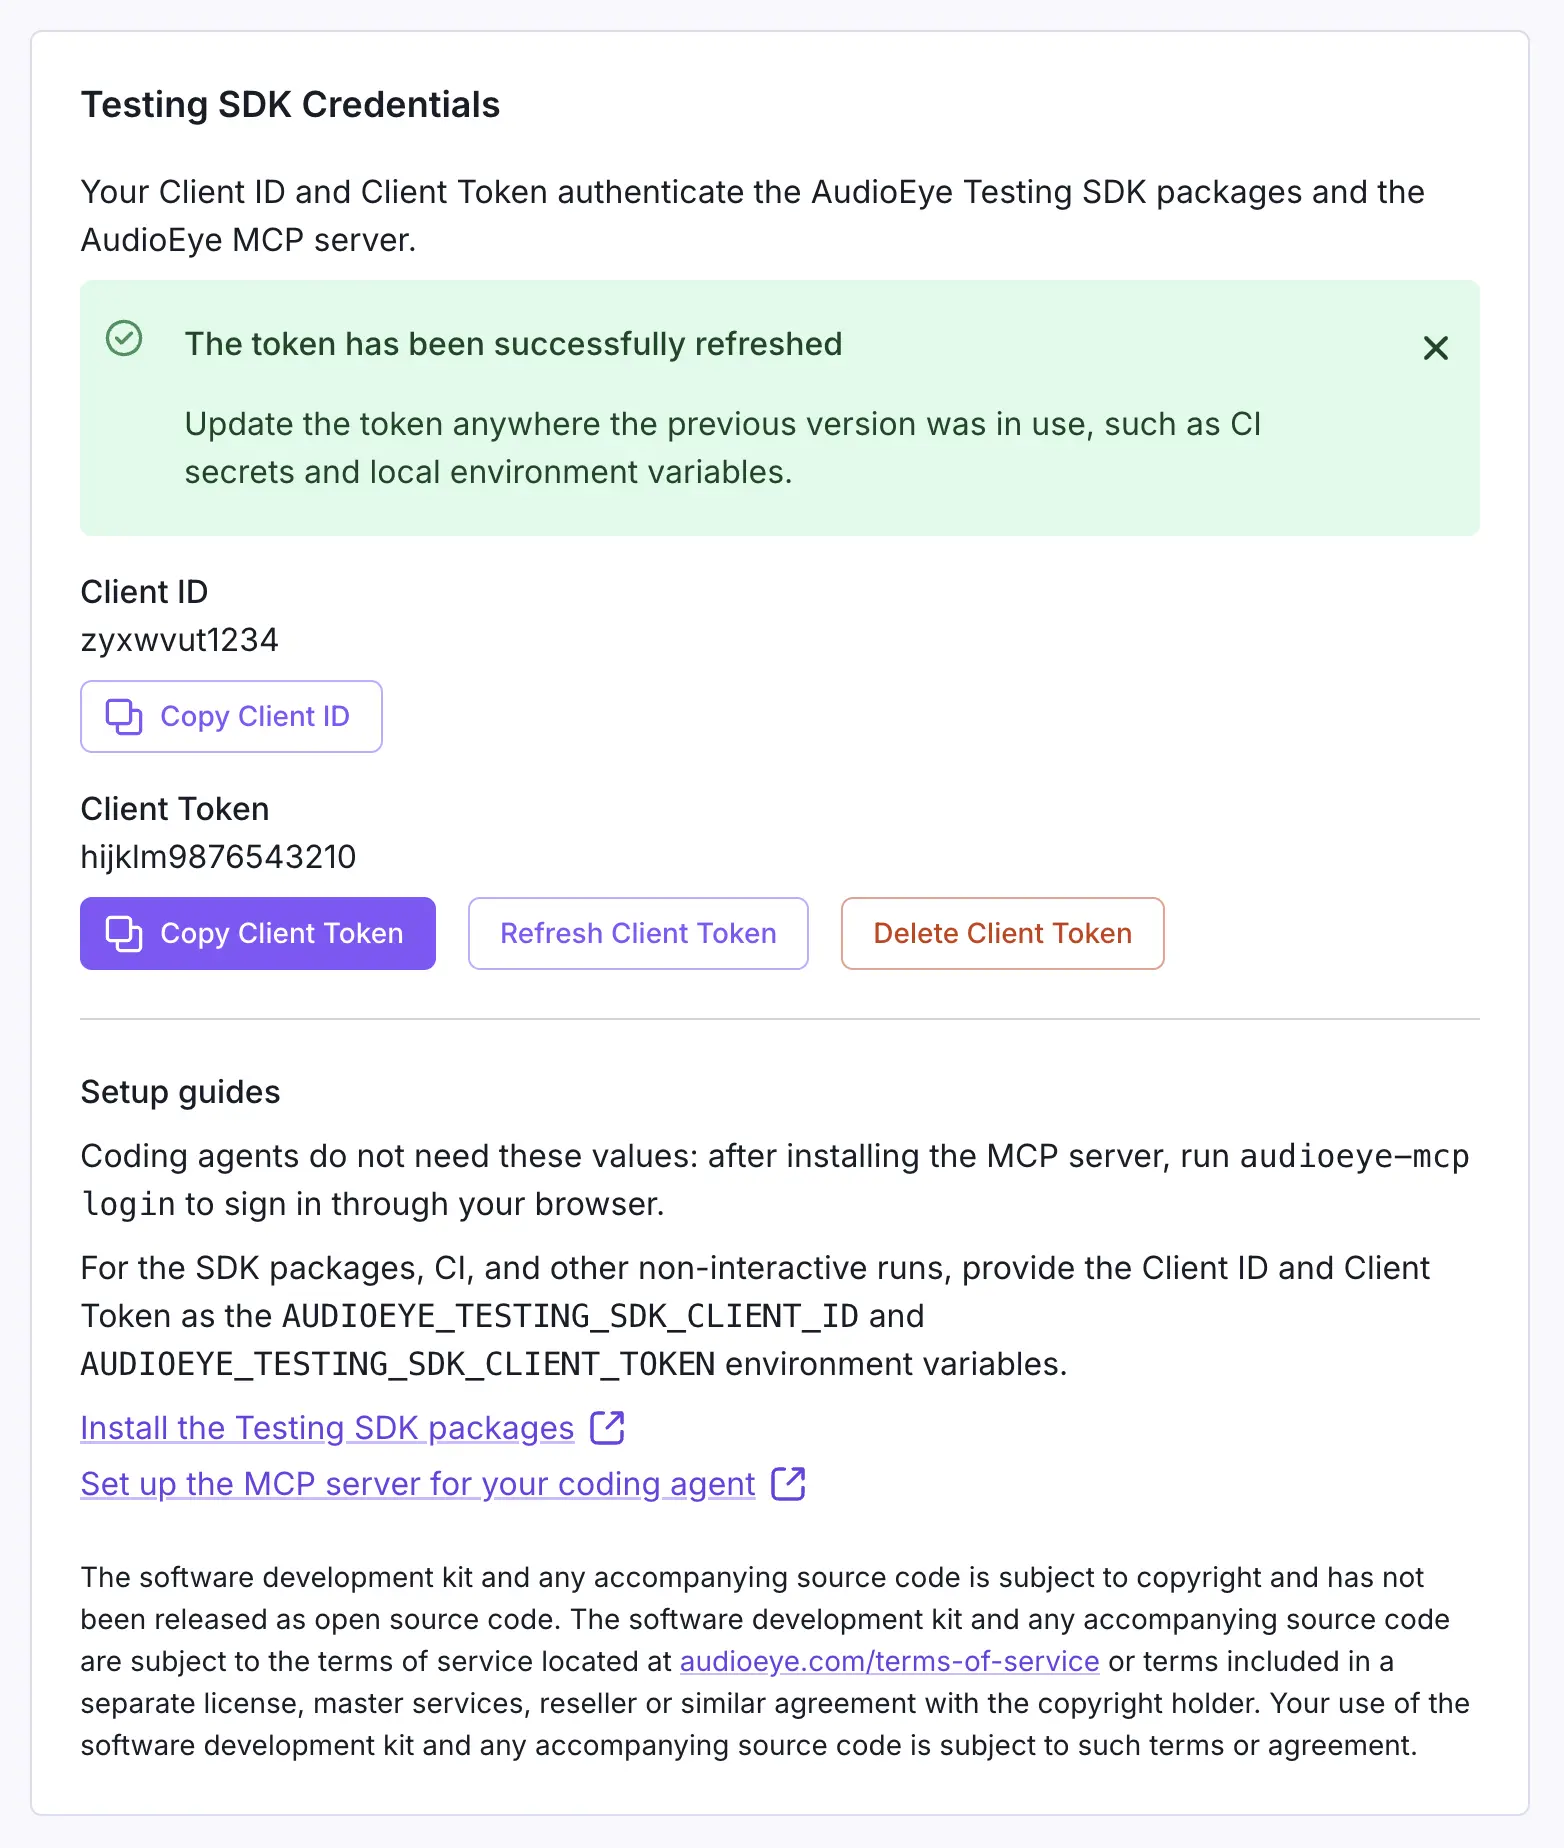
Refreshing revokes the previous Client Token, so anyone still using it will be locked out. After rotating it, update every local environment and CI/CD secret that uses it. Then repeat the configuration steps in Step 2: Configure your package manager.
Step 2: Configure your package manager
Choose the package manager your project already uses, then add the configuration file at the root of the project. The
root is the directory that contains package.json.
If the file already exists, add the @audioeye registry settings to the existing file instead of replacing the whole
file.
- npm (.npmrc)
- yarn (.yarnrc.yml)
- pnpm (.npmrc)
Create or update .npmrc in your project root with:
@audioeye:registry=https://npm.cloudsmith.io/audioeye-K01/audioeye/
//npm.cloudsmith.io/audioeye-K01/audioeye/:_authToken=${AUDIOEYE_TESTING_SDK_CLIENT_TOKEN}
Recommended: use the environment-variable reference shown above instead of hardcoding the token directly into
.npmrc.
The same Client Token authenticates package installs, and together with your Client ID it licenses the SDK at run time, so export both variables:
export AUDIOEYE_TESTING_SDK_CLIENT_ID=your-client-id-here
export AUDIOEYE_TESTING_SDK_CLIENT_TOKEN=your-client-token-here
- Temporarily in your current shell session: run the two
exportcommands above. - Persistently for local development: add the same
exportcommands to your shell profile, such as~/.zshrcor~/.bashrc. - In CI/CD: store both values as secrets and expose them as
AUDIOEYE_TESTING_SDK_CLIENT_IDandAUDIOEYE_TESTING_SDK_CLIENT_TOKENduring dependency installation and during any step that runs a scan.
Never commit the Client Token to source control.
Verify your npm configuration
Install one of the SDK packages:
npm install -D @audioeye/testing-sdk-cli
If installation succeeds, your registry configuration is working.
If installation fails with an authentication or package-resolution error, confirm that:
AUDIOEYE_TESTING_SDK_CLIENT_TOKENis set in the same shell where you runnpm install.npmrcis in the same directory aspackage.json- the
@audioeyeregistry lines were added exactly as shown above
Create or update .yarnrc.yml in your project root with:
npmScopes:
  audioeye:
    npmAlwaysAuth: true
    npmAuthToken: '${AUDIOEYE_TESTING_SDK_CLIENT_TOKEN}'
    npmRegistryServer: 'https://npm.cloudsmith.io/audioeye-K01/audioeye/'
Recommended: use the environment-variable reference shown above instead of hardcoding the token directly into
.yarnrc.yml.
The same Client Token authenticates package installs, and together with your Client ID it licenses the SDK at run time, so export both variables:
export AUDIOEYE_TESTING_SDK_CLIENT_ID=your-client-id-here
export AUDIOEYE_TESTING_SDK_CLIENT_TOKEN=your-client-token-here
- Temporarily in your current shell session: run the two
exportcommands above. - Persistently for local development: add the same
exportcommands to your shell profile, such as~/.zshrcor~/.bashrc. - In CI/CD: store both values as secrets and expose them as
AUDIOEYE_TESTING_SDK_CLIENT_IDandAUDIOEYE_TESTING_SDK_CLIENT_TOKENduring dependency installation and during any step that runs a scan.
Never commit the Client Token to source control.
Verify your Yarn configuration
Install one of the SDK packages:
yarn add -D @audioeye/testing-sdk-cli
If installation succeeds, your registry configuration is working.
If installation fails with an authentication or package-resolution error, confirm that:
AUDIOEYE_TESTING_SDK_CLIENT_TOKENis set in the same shell where you runyarn install.yarnrc.ymlis in the same directory aspackage.json- the
npmScopes.audioeyeconfiguration was added exactly as shown above
Create or update .npmrc in your project root with:
@audioeye:registry=https://npm.cloudsmith.io/audioeye-K01/audioeye/
//npm.cloudsmith.io/audioeye-K01/audioeye/:_authToken=${AUDIOEYE_TESTING_SDK_CLIENT_TOKEN}
pnpm reads npm registry authentication from .npmrc, so you can use the same private-registry configuration shown for
npm.
Recommended: use the environment-variable reference shown above instead of hardcoding the token directly into
.npmrc.
The same Client Token authenticates package installs, and together with your Client ID it licenses the SDK at run time, so export both variables:
export AUDIOEYE_TESTING_SDK_CLIENT_ID=your-client-id-here
export AUDIOEYE_TESTING_SDK_CLIENT_TOKEN=your-client-token-here
- Temporarily in your current shell session: run the two
exportcommands above. - Persistently for local development: add the same
exportcommands to your shell profile, such as~/.zshrcor~/.bashrc. - In CI/CD: store both values as secrets and expose them as
AUDIOEYE_TESTING_SDK_CLIENT_IDandAUDIOEYE_TESTING_SDK_CLIENT_TOKENduring dependency installation and during any step that runs a scan.
Never commit the Client Token to source control.
Verify your pnpm configuration
Install one of the SDK packages:
pnpm add -D @audioeye/testing-sdk-cli
If installation succeeds, your registry configuration is working.
If installation fails with an authentication or package-resolution error, confirm that:
AUDIOEYE_TESTING_SDK_CLIENT_TOKENis set in the same shell where you runpnpm install.npmrcis in the same directory aspackage.json- the
@audioeyeregistry lines were added exactly as shown above
Step 3: Install your first SDK package
Once your package manager is configured, install the SDK package that matches your workflow.
If you are evaluating the SDK for the first time, start with the CLI even if you plan to use Jest, Playwright, or Cypress later. It gives you the shortest path to a first successful run.
- CLI
- Jest
- Playwright
- Cypress
- MCP server
- Core
npm install -D @audioeye/testing-sdk-cli
yarn add -D @audioeye/testing-sdk-cli
pnpm add -D @audioeye/testing-sdk-cli
Recommended first step for new users.
Then continue with the CLI guide.
npm install -D @audioeye/testing-sdk-jest
yarn add -D @audioeye/testing-sdk-jest
pnpm add -D @audioeye/testing-sdk-jest
Then continue with the Jest guide.
npm install -D @audioeye/testing-sdk-playwright
yarn add -D @audioeye/testing-sdk-playwright
pnpm add -D @audioeye/testing-sdk-playwright
Then continue with the Playwright guide.
npm install -D @audioeye/testing-sdk-cypress
yarn add -D @audioeye/testing-sdk-cypress
pnpm add -D @audioeye/testing-sdk-cypress
Then continue with the Cypress guide.
The MCP server does not use the private registry. It installs globally from public npm, registers with every MCP host on your machine in one command, and signs in through your browser instead of environment variables:
npm install -g @audioeye/testing-sdk-mcp
audioeye-mcp setup
audioeye-mcp login
Follow the MCP server guide for per-host registration (Claude Code, Cursor, VS Code, Claude Desktop, and more), signing in, and running your first scan-and-fix.
npm install -D @audioeye/testing-sdk-core
yarn add -D @audioeye/testing-sdk-core
pnpm add -D @audioeye/testing-sdk-core
Then continue with the Core / custom integrations guide.
Step 4: Verify the installation
After installation, run a quick verification so you know onboarding is complete before moving into framework-specific setup.
Make sure both AUDIOEYE_TESTING_SDK_CLIENT_ID and AUDIOEYE_TESTING_SDK_CLIENT_TOKEN are exported in the shell you
run this from — the scan performs the license check described in How licensing works. On a
developer machine, aetest login satisfies the check instead; the Client Token is still required to install packages
from Cloudsmith and in CI.
Fastest verification path: use the CLI
If you installed the CLI, run:
- npm / npx
- Yarn
- pnpm
npx aetest scan 'https://www.audioeye.com'
yarn aetest scan 'https://www.audioeye.com'
pnpm exec aetest scan 'https://www.audioeye.com'
A successful first run typically confirms that:
- the package installed correctly
- your client credentials are configured correctly and your license verified
- your local environment can execute the SDK successfully
If the scan exits with Error running scan: Set AUDIOEYE_TESTING_SDK_CLIENT_ID and ... or
Error running scan: The AudioEye testing SDK token is invalid or inactive., your Client ID or Client Token is missing
or invalid — revisit Step 1 and Step 2.
If you installed a framework-specific package
If you started with Jest, Playwright, or Cypress instead of the CLI, continue to the corresponding guide and complete its first example:
CI/CD integration
The Testing SDK needs your client credentials in two places in CI: during dependency installation (so the package
manager can download from Cloudsmith) and during any step that runs a scan (so the SDK can verify your license).
Expose both AUDIOEYE_TESTING_SDK_CLIENT_ID and AUDIOEYE_TESTING_SDK_CLIENT_TOKEN for those steps.
CI/CD checklist
Before you add the SDK to your pipeline, make sure that:
- your repository already contains the correct
.npmrcor.yarnrc.ymlconfiguration - your CI provider stores
AUDIOEYE_TESTING_SDK_CLIENT_IDandAUDIOEYE_TESTING_SDK_CLIENT_TOKENas secrets - both secrets are exposed during
npm install,npm ci,yarn install, orpnpm install - both secrets are also exposed during the step that runs your accessibility scans
- your workflow uses a supported Node.js version:
22or24
GitHub Actions example
- Make sure your repository already contains the
.npmrcor.yarnrc.ymlconfiguration shown above. - Create
repository secrets in GitHub
named
AUDIOEYE_TESTING_SDK_CLIENT_IDandAUDIOEYE_TESTING_SDK_CLIENT_TOKEN. - Expose those secrets during dependency installation so the package manager can authenticate to Cloudsmith, and during the step that runs your scans so the SDK can verify your license.
- npm
- yarn
- pnpm
name: Pull Request CI

on:
  pull_request:

permissions:
  contents: read

env:
  AUDIOEYE_TESTING_SDK_CLIENT_ID: ${{ secrets.AUDIOEYE_TESTING_SDK_CLIENT_ID }}
  AUDIOEYE_TESTING_SDK_CLIENT_TOKEN: ${{ secrets.AUDIOEYE_TESTING_SDK_CLIENT_TOKEN }}

jobs:
  build:
    name: Build and Test
    runs-on: ubuntu-latest
    steps:
      - uses: actions/checkout@v6

      - name: Setup Node
        uses: actions/setup-node@v6
        with:
          node-version: '24'

      - name: Install dependencies
        run: npm ci

      - name: Build
        run: npm run build

      - name: Test
        run: npm test
name: Pull Request CI

on:
  pull_request:

permissions:
  contents: read

env:
  AUDIOEYE_TESTING_SDK_CLIENT_ID: ${{ secrets.AUDIOEYE_TESTING_SDK_CLIENT_ID }}
  AUDIOEYE_TESTING_SDK_CLIENT_TOKEN: ${{ secrets.AUDIOEYE_TESTING_SDK_CLIENT_TOKEN }}

jobs:
  build:
    name: Build and Test
    runs-on: ubuntu-latest
    steps:
      - uses: actions/checkout@v6

      - name: Setup Node
        uses: actions/setup-node@v6
        with:
          node-version: '24'

      - name: Install dependencies
        run: yarn install --immutable

      - name: Build
        run: yarn run build

      - name: Test
        run: yarn test
name: Pull Request CI

on:
  pull_request:

permissions:
  contents: read

env:
  AUDIOEYE_TESTING_SDK_CLIENT_ID: ${{ secrets.AUDIOEYE_TESTING_SDK_CLIENT_ID }}
  AUDIOEYE_TESTING_SDK_CLIENT_TOKEN: ${{ secrets.AUDIOEYE_TESTING_SDK_CLIENT_TOKEN }}

jobs:
  build:
    name: Build and Test
    runs-on: ubuntu-latest
    steps:
      - uses: actions/checkout@v6

      - name: Setup pnpm
        uses: pnpm/action-setup@v5

      - name: Setup Node
        uses: actions/setup-node@v6
        with:
          node-version: '24'
          cache: 'pnpm'

      - name: Install dependencies
        run: pnpm install --frozen-lockfile

      - name: Build
        run: pnpm build

      - name: Test
        run: pnpm test
Defining the secrets at the workflow env level (as shown) makes them available to every step, including both install
and test. If you prefer to scope them per step, add the same two env entries to your install step and to your test
step.
Cache the license grace token (optional)
After a successful license check, the SDK writes a license grace token to ~/.cache/audioeye-testing-sdk. That
token stays valid for up to 7 days, and the SDK refreshes it online about every 24 hours, falling back to the cached
copy whenever AudioEye can't be reached (see How licensing works). CI runners start with an
empty home directory, so by default every run performs a fresh online validation.
Caching that directory across runs lets the SDK reuse a still-valid grace token and skip the network round-trip. It also makes your pipeline resilient to a temporary AudioEye outage: as long as a run within the last 7 days cached a grace token, scans keep passing even if the validation API is briefly unreachable. This is safe to skip — an absent or expired cache simply triggers a normal online re-validation — and your client credentials are still required either way; the cache never replaces them.
Add a cache step before the step that runs your scans:
- name: Cache AudioEye license grace token
  uses: actions/cache@v4
  with:
    path: ~/.cache/audioeye-testing-sdk
    # A unique key per run always misses, which forces the cache to save the
    # freshest grace token (including a just-refreshed one) at the end of the job.
    key: audioeye-sdk-grace-${{ runner.os }}-${{ github.run_id }}
    # restore-keys falls back to the most recent prior cache, so each run starts
    # from the latest grace token written by an earlier run.
    restore-keys: |
      audioeye-sdk-grace-${{ runner.os }}-
This "unique key + restore-keys prefix" pattern keeps the cache refreshed: every run restores the newest existing
grace and then saves an updated one, so the cached token never goes stale across runs.
Custom home or runner image? The SDK honors the
AUDIOEYE_TESTING_SDK_CACHE_DIRenvironment variable to relocate the cache. If you set it, point thepath:above at the same directory.
Security guidance
Follow these practices when configuring the SDK in local and CI environments:
- keep the Client Token in environment variables or secret managers; the Client ID is not secret, but treating both as secrets is simplest
- do not hardcode the Client Token in committed files
- rotate the Client Token if you believe it has been exposed
- update all developer environments and CI secrets immediately after rotating the token
- use a unique token for CI environments and for each user
Next steps
After completing this guide, continue to the package-specific documentation for the workflow you want to use:
If you run into installation or authentication issues, see Troubleshooting.